
User Guide
How to Use Global Data Types
Overview
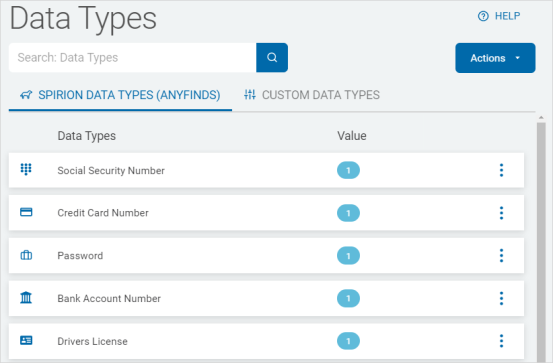
The Global Data Types screen is where you manage your Data Types, both custom and built-in (Spirion AnyFinds™).
-
Spirion AnyFinds™ Data Types are provided by default, and include:
-
Social Security number
-
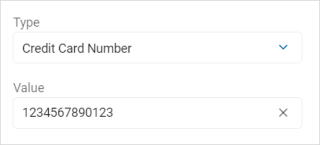
Credit card Number
-
Password
-
Bank Account Number
-
Driver's License
-
Date of Birth
-
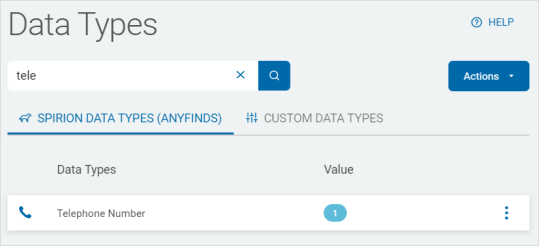
Telephone Number
-
E-mail Address
-
Personal Address
-
Passport Number
-
more
-
-
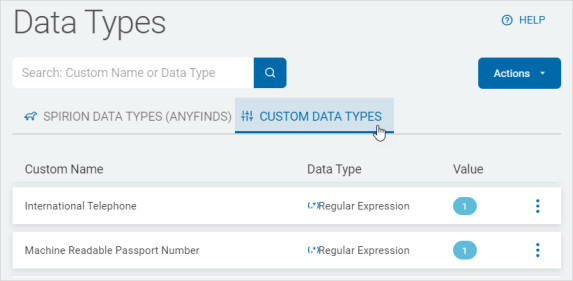
Custom Data Types are:
-
Data types defined by you
-
Examples:
-
IMEI
-
ABN
-
Search API (13.6 Agents only)
-
-
Access and View Data Types
To view Global Data Types:
-
From the left menu, click Settings.
-
Click Global Data Types.

-
Data Types are displayed in a list sort by columns.
-
Click a tab to further sort by Data Types:
-
Spirion Data Types
-
Custom Data Types
-
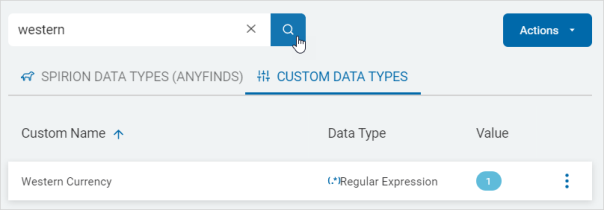
Search for a Data Type
To search for a Data Type:
-
From the Spirion Data Types tab:
-
Type a Data Type in the search box.
-
The results are displayed in the list below.
-
-
Custom Data Types tab :
-
Type a Custom Name or Data Type in the search box.
-
Click the lens icon or Enter on your keyboard.
-
The results are displayed in the list below.
-
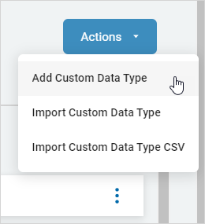
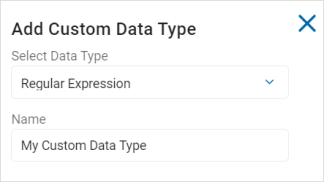
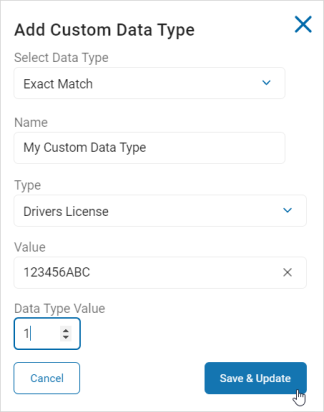
Add a Custom Data Type
To add a custom Data Type:
-
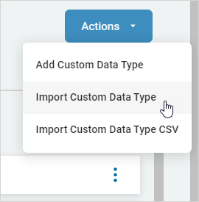
Click Actions.
-
Click Add Custom Data Type.
-
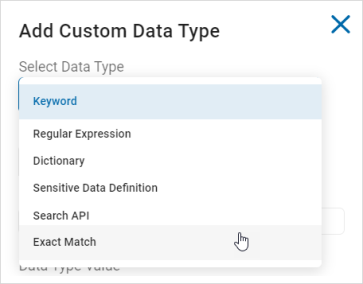
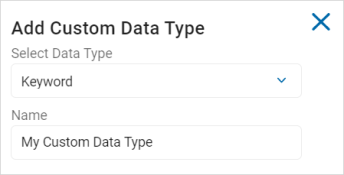
In the Add Custom Data Type pop-up window, select a Data Type from the drop-down list.
-
Expand a section for how to add each Data Type.
-
For more detailed information see Spirion AnyFind and Common Data Types Explained.
-
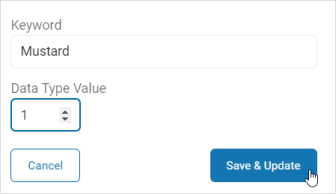
Keyword
Procedure:
-
Name: Type the name of your Data Type.
-
Keyword: Type the keyword you want to use.
-
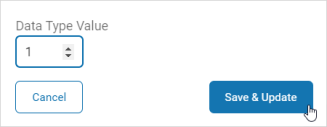
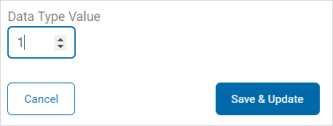
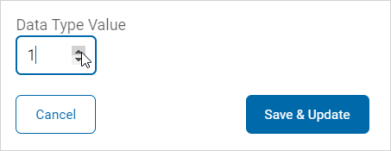
Data Type Value: Use the numeric up-down control to set a value.
Note: Data Type Value is the number you assign to the Data Type to give it weight.
For example:
1. Assign a Data Type Value of '1'.
2. Run the scan and find five instances of that value.
3. The sum total, or weight, is '5'.
This enable you to add emphasis to certain Data Types to gain insight into your data. -
Click Save & Update to save the new Data Type or Cancel to discard.
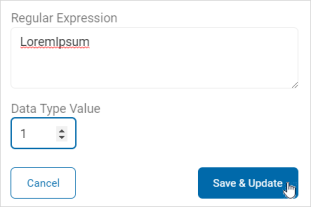
Regular Expression
Procedure:
-
Name: Type the name of your Data Type.
-
Regular Expression: Type the expression in the text box.
-
Data Type Value: Use the numeric up-down control to set a value.
-
Click Save & Update to save the new Data Type or Cancel to discard.
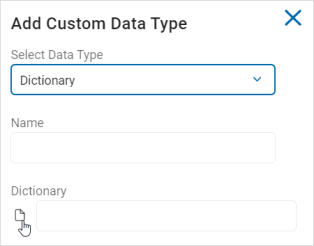
Dictionary
Procedure:
-
Click the folded paper icon to upload a Dictionary file (.dic) from your local computer.
-
Name: This field is filled automatically from the file.
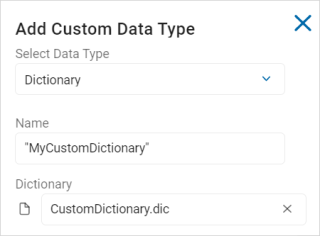
-
Data Type Value: Use the numeric up-down control set a value.
-
Click Save & Update to save the new Data Type or Cancel to discard.
Note: Dictionary files must be in the following format and saved with a file extension of type .dic.
[Header]
Name="Dictionary_Name"
[Words]
Word_1
Word_2
Word_3
Word_4
For example:
[Header]
Name="My New Dictionary"
[Words]
Black
Blue
Canary
Indigo
Magenta
Orange
Red
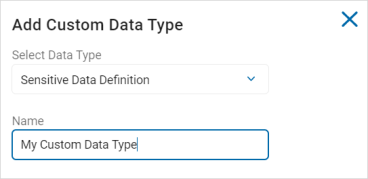
Sensitive Data Definition
Procedure:
-
Name: Type the name of your Data Type.
-
In the Definition section, fill in the following:
-
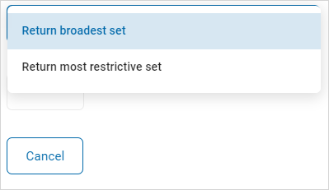
Left criteria drop-down list:
-
Click the more options menu.

-
-
-
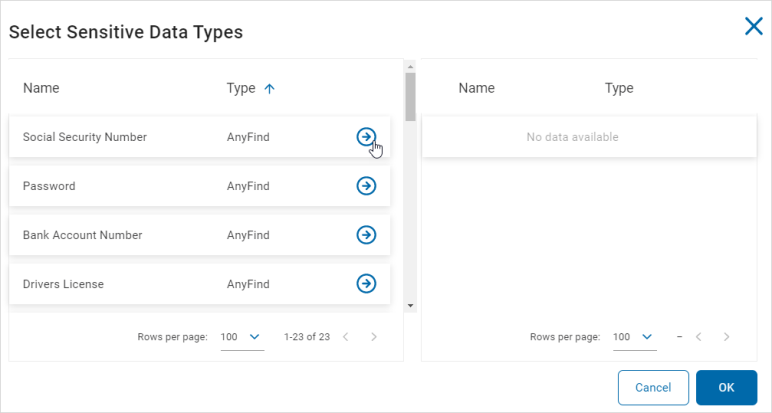
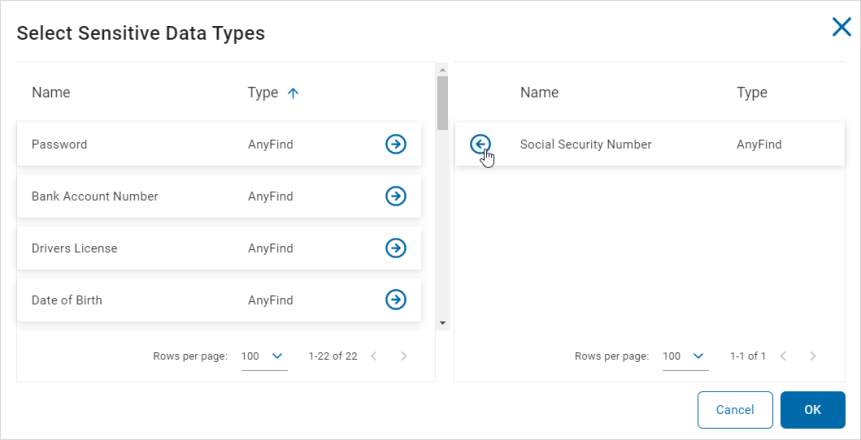
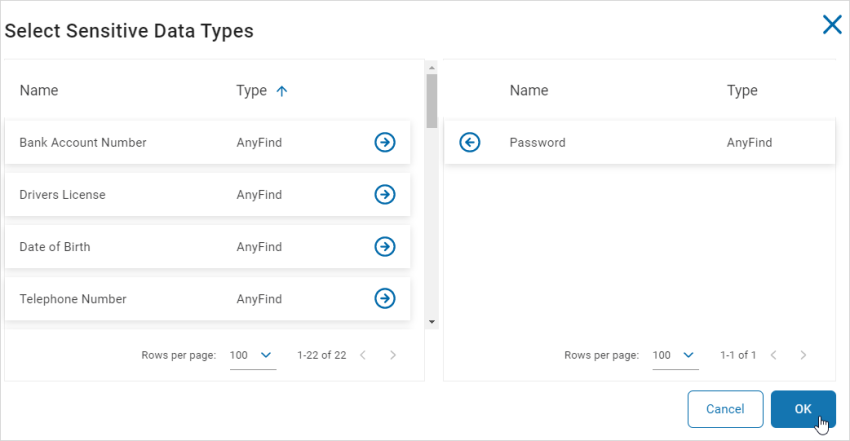
In the Select Sensitive Data Types pop-up window, click a tile with a right arrow to move it the available data types column.
-
For example: Social Security number
-
-
To remove an available Sensitive Data Type, click a tiles with a left arrow.
-
Click OK to save or Cancel to discard.
-
Center criteria drop-down list: Select an option from the drop-down list.

-
Right criteria: Click the more options menu and select an option from the drop-down list.

-
For example: Near with Distance | Bank Account Number | 2.

-
For example: Less Than| 100 | Unique Matches.

-
The following table displays the right criteria options available. (These options are determined by the center criteria choice):
| Center Criteria | Right Criteria | Additional Criteria |
|---|---|---|
| Near | Click a tile with a right arrow to move it the available data types column and click OK. | |
| Near with Distance | Click a tile with a right arrow to move it the available data types column and click OK. | Use the numeric up-down control to set a value. |
| Near Before | Click a tile with a right arrow to move it the available data types column and click OK. | |
| Near Before with Distance | Click a tile with a right arrow to move it the available data types column and click OK. | Use the numeric up-down control to set a value. |
| Near After | Click a tile with a right arrow to move it the available data types column and click OK. | |
| Near After with Distance | Click a tile with a right arrow to move it the available data types column and click OK. | Use the numeric up-down control to set a value. |
| Far | Click a tile with a right arrow to move it the available data types column and click OK. | |
| Far with Distance | Click a tile with a right arrow to move it the available data types column and click OK. | Use the numeric up-down control to set a value. |
| Far Before | Click a tile with a right arrow to move it the available data types column and click OK. | |
| Far Before with Distance | Click a tile with a right arrow to move it the available data types column and click OK. | Use the numeric up-down control to set a value. |
| Far After | Click a tile with a right arrow to move it the available data types column and click OK. | |
| Far After with Distance | Click a tile with a right arrow to move it the available data types column and click OK. | Use the numeric up-down control to set a value. |
| Before | Click a tile with a right arrow to move it the available data types column and click OK. | |
| After | Click a tile with a right arrow to move it the available data types column and click OK. | |
| Equals | Use the numeric up-down control to set a value. | Select one: • Unique Matches • Total Matches |
| Does Not Equal | Use the numeric up-down control to set a value. | Select one: • Unique Matches • Total Matches |
| Less Than | Use the numeric up-down control to set a value. | Select one: • Unique Matches • Total Matches |
| Less Than or Equals | Use the numeric up-down control to set a value. | Select one: • Unique Matches • Total Matches |
| Greater Than | Use the numeric up-down control to set a value. | Select one: • Unique Matches • Total Matches |
| Greater Than or Equals | Use the numeric up-down control to set a value. | Select one: • Unique Matches • Total Matches |
| Require | Use the numeric up-down control to set a value of at least this many Data Types. | Select one: • Unique Matches • Total Matches |
| Allow | Use the numeric up-down control to set a value of no more than this many Data Types. | Select one: • Unique Matches • Total Matches |
-
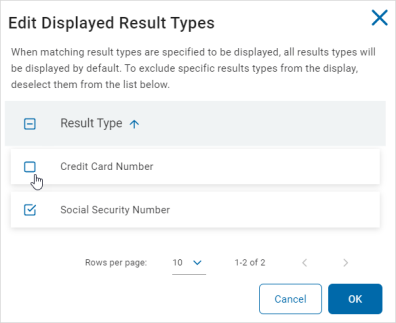
When matching result types are specified to be displayed, all results types will be displayed by default.
To exclude specific results types from the display:-
Click Configure Display Types.
-
Deselect the specific results you want to exclude.
-
Click OK to save or Cancel to discard.
-
-
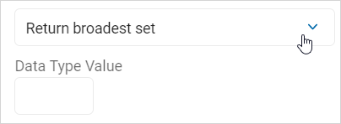
Select an option from the restriction drop-down list.
-
Data Type Value: Use the numeric up-down control to set a value.
-
Click Save & Update to save the changes or click the x in the top right of the window to discard.
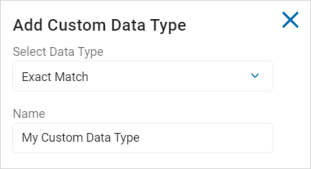
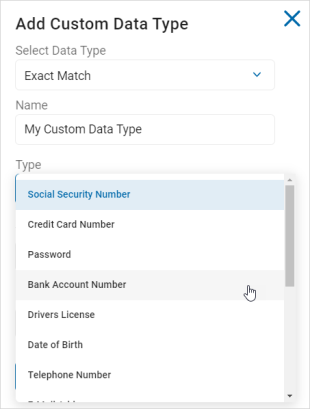
Exact Match
Procedure:
-
Name: Type the name of the Custom Data Type.
-
Type: Select an option from the drop-down list.
-
Value: Enter the value the corresponds to the type selected. The hint text will describe the required format, if applicable.
-
Data Type Value: Use the numeric up-down control to set the value.
-
Click Save & Update to create the new Data Type or Cancel to discard.
Import a Custom Data Type
To import a custom Data Type:
-
Click Actions.
-
Click Import Custom Data Type.
-
Locate your file on your local computer.
Note: File format .xml is required.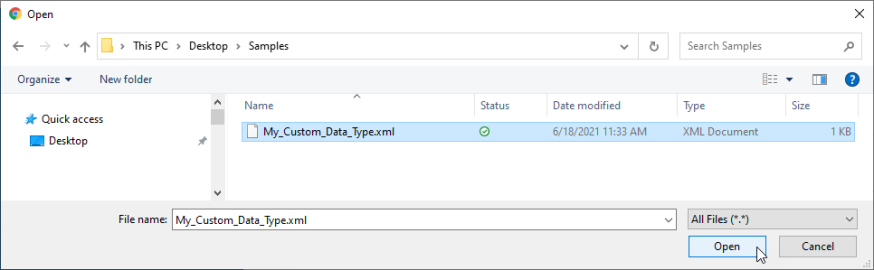
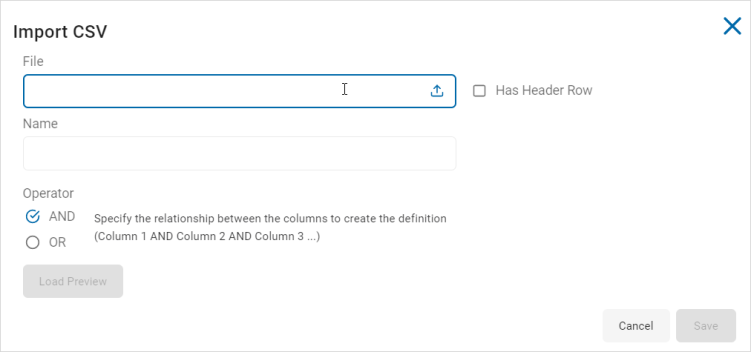
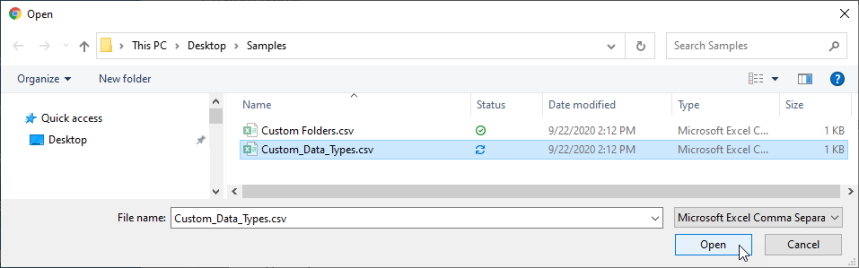
Import a Custom Data Type (.csv)
To import a custom .csv format Data Type:
-
Click Actions.
-
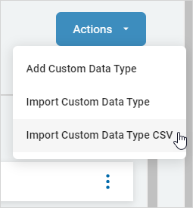
Click Import Custom Data Type CSV.
-
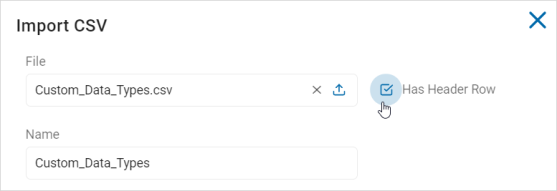
In the Import CSV pop-up window, click the file box to activate it.
-
Locate the .csv file on your local computer. The Name field is filled in automatically with the name of your file.
-
Select Has Header Row, if applicable.
-
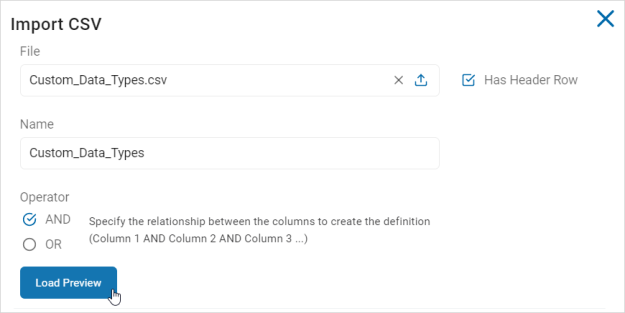
Operator: Select an operator to specific the relationship between the columns.
-
Click Load Preview to review your upload.
-
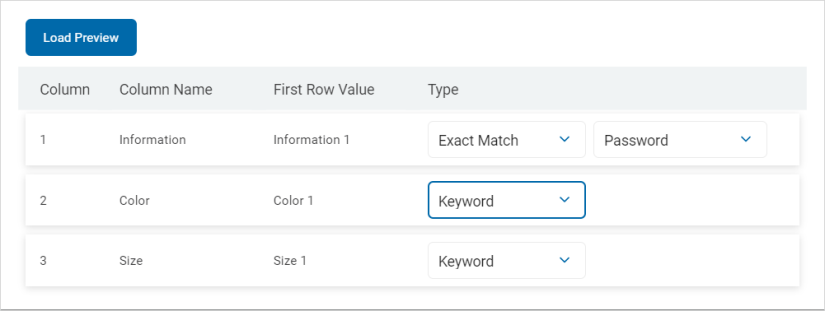
In the Load Preview section, do the following:
-
Review the data in the columns.
-
In the Type column, select an option from the drop-down list.
-
If you select Exact Match as the Type, select an option from the Data Type drop-down list to the left.
-
For example: Information 1 | Exact Match | Password
-
-
-
Click Save to save and import the file or Cancel to discard.
Edit a Spirion AnyFinds™ Data Type
To edit an AnyFinds™ Data Type:
-
Ensure you are on the SPIRION DATA TYPES (ANYFINDS) tab.
-
Locate the Data Type you want to edit in the list.
-
On the far right of the row, click the more options menu.
-
Click Edit.
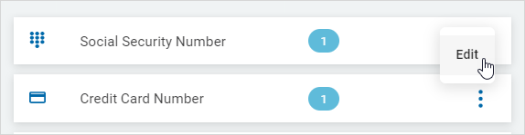
-
In the Edit Data Type pop-up window, make needed changes.
-
Click Save & Update to save changes or Cancel to discard.
Note: You can change to a different Spirion Data Type in the Edit Data Type pop-up window by selecting a different option from the drop-down list.
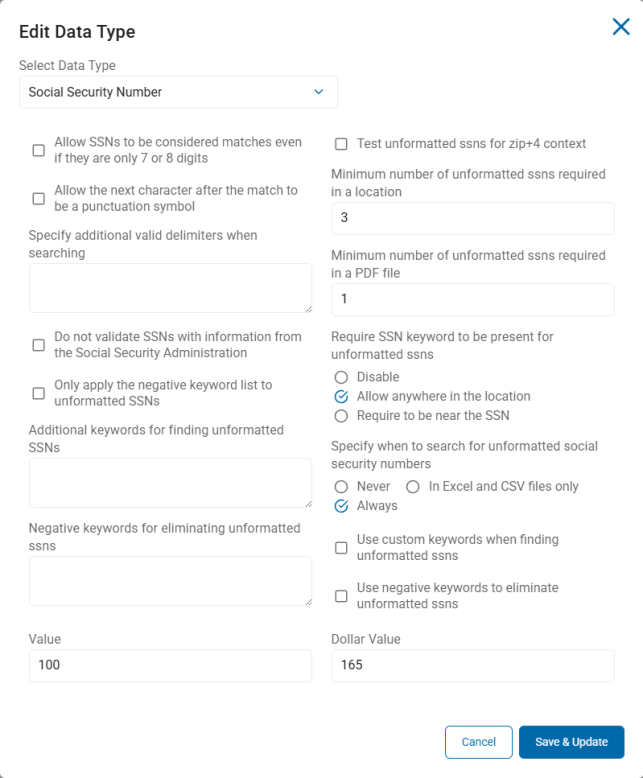
Data Type Settings
AnyFind Data Types
Social Security Number
-
Allow SSNs to be considered matches even if they are only 7 or 8 digits
-
Because Social Security numbers (SSNs) are required to be 9 digits long and Excel does not always store leading zero's, Social Security numbers that begin with one or two zeros may not be found, by default.
-
For example, if a Social Security number is entered into Excel as "001-23-4567," it may be stored internally as "1234567," and therefore will not be found as a valid Social Security number during a search.
-
Enabled this setting to cause the endpoint application to:
-
Assume 7-digit numbers have two leading zeros
-
Assume 8-digit numbers have one leading zero
-
Then evaluate those 9-digit numbers for validity as Social Security numbers
-
-
-
Disabled - Default. Do not allow Social Security numbers to be considered matches even if they are only 7 or 8 digits
-
*Windows only setting. This setting does not apply to Mac or Linux.
-
-
Allow the next character after the match to be a punctuation symbol
-
Enabled - To scan for potential Social Security number matches with a punctuation character (period, question mark, or semi-colon) at the end of the number, enable this setting. When enabled, this enables terms such as "123-45-6789?" to qualify as a valid Social Security number as long as the number could be valid and the punctuation character is followed by whitespace.
-
Disabled - Default. Do not allow for potential Social Security number matches with a punctuation character at the end of the number.
-
-
Specify additional valid delimiters when searching
-
To add additional character delimiters such as pipe (|) or caret (^) to a search, specify them here, one delimiter per line.
-
-
Do not validate SSNs with information from the Social Security Administration
-
By default, the endpoint application uses information published monthly by the US Social Security Administration (and updated as part of the AnyFind definitions) as one of multiple steps to validate that a potential Social Security number (SSN) is a valid Social Security number.
-
As of June 25, 2011, the SSA changed the method of allocation of Social Security numbers from a structured method to a randomized method. Because of this change, it is no longer possible to determine if a particular Social Security number has potentially been issued (with the exception of specific area numbers that are unused).
-
Disabled - When searching for historical Social Security numbers, there will be fewer false positives.
-
Enabled - When searching for Social Security numbers issued after June 25, 2011, enable this setting to prevent false negatives.
-
-
Only apply the negative keyword list to unformatted SSNs
-
Enabled - By default, when "Use negative keywords to eliminate unformatted SSNs" is enabled and a list of negative keywords is specified in "Negative keywords for eliminating unformatted ssns", those keywords are used to eliminate both formatted and unformatted Social Security numbers. Enable this setting to apply the keywords only to unformatted Social Security numbers.
-
Disabled - Default. Do not apply negative keywords only to unformatted Social Security numbers.
-
-
Additional keywords for finding unformatted SSNs
-
List of additional, custom keywords to be used when scanning for unformatted Social Security numbers
-
-
Negative keywords for eliminating unformatted social security numbers
-
List of additional, negative keywords to be used when the setting "Use negative keywords to eliminate unformatted ssns" is enabled.
-
Keywords must be entered one per line.
-
-
Test unformatted ssns for zip+4 context
-
Unformatted Social Security numbers are 9-digit numbers. Zip codes in the zip+4 format often appear, unformatted, as 9-digit numbers. While there are many valid overlaps (9-digit numbers that are both a valid Social Security number as well as a valid zip+4), it is possible to eliminate unformatted zip+4 false positives when other identifying address information is present.
-
Enabled - Apply additional tests to unformatted Social Security numbers to eliminate false positives caused by unformatted zip+4s.
-
Disabled - Do not apply additional tests to eliminate unformatted zip+4 false positives when other identifying address information is present.
-
*Windows only setting. This setting does not apply to Mac or Linux.
-
-
Minimum number of unformatted ssns required in a location
-
Specify the minimum number of unformatted Social Security numbers that must be found in a search location (file) before any of them are considered a match. This applies to all search locations (files) other than PDF files.
-
-
Minimum number of unformatted ssns required in a PDF file
-
Specify the minimum number of unformatted Social Security numbers that must be found in a PDF file before any of them can be considered a match.
-
-
Require SSN keyword to be present for unformatted ssns
-
By default, a Social Security number keyword must be present in the search location (file) of the potential unformatted Social Security number before the potential unformatted Social Security number can be considered a match.
-
Disable - Disable checking for the presence of keywords in the search location (file) of the potential unformatted Social Security number to consider unformatted Social Security numbers as matches.
-
Allow anywhere in the location - Require a keyword to be anywhere in the search location (file) for the unformatted Social Security number to be considered a match.
-
Require to be near the SSN - Require a keyword to be near (within 50 characters) the unformatted Social Security number in order to consider the Social Security number a match.
-
-
Specify when to search for unformatted social security numbers
-
Never - Never search for unformatted Social Security numbers
-
In Excel and CSV files only - Search for unformatted Social Security numbers in Excel and CSV files only
-
Always - Always search for unformatted Social Security numbers
-
-
Use custom keywords when finding unformatted ssns
-
Enabled - Enable the use of additional, custom keywords to use when finding unformatted Social Security numbers.
-
Disabled - Disable the use of additional, custom keywords to use when finding unformatted Social Security numbers
-
-
Use negative keywords to eliminate unformatted ssns
-
Any keyword in the field "Negative keywords for eliminating unformatted ssns" that appears before each potential unformatted Social Security number, will cause that Social Security number to be dropped from search results.
-
For example, if a file contains "Tracking: 123456789," and "123456789" is a valid Social Security number, with this setting is enabled and "Tracking" listed as an entry in the list, then the term "123456789' does not appear as a search result.
-
Enabled - Use negative keywords to eliminate unformatted Social Security numbers.
-
Disabled - Do not use negative keywords to eliminate unformatted Social Security numbers.
-
-
Value
-
Ordinal value of each instance of the sensitive data type - a credit card number, in this case.
-
For monetary value, see Dollar Value, below.
-
-
Dollar Value
-
Value, in US dollars, of every instance of the sensitive data type (credit card number, in this case).
-
Default values are taken from various reports such as the IBM data breach report, Gartner, and Ponemon.
-
Credit Card Number
-
Specify that an expiration date or a CVV be near a card number
-
When this setting is enabled, by default, either a CVV or expiration date are required to be near (within 50 characters) a potential credit card number before the number can be considered a match.
-
When the settings "Require a CVV/CID number to be near a card number" and "Require an expiration date to be near a card number" are both enabled, then the credit card number must be near (within 50 characters) both a CVV and an expiration date to be considered a match.
-
When either the setting "Require a CVV/CID number to be near a card number" or the setting "Require an expiration date to be near a card number" are enabled then the credit card number can be near (within 50 characters) either a CVV or an expiration date to be considered a match.
-
-
Specify additional valid delimiters when searching
-
Enabled - Default. To add additional character delimiters such as pipe (|) or caret (^) to a search, specify them here, one delimiter per line.
-
Disabled - Use no additional valid delimiters when searching for credit card numbers
-
-
Negative keywords for eliminating credit card numbers
-
This setting works in conjunction with the setting "Use negative keywords to eliminate credit card numbers."
-
Enabled - With the setting "Use negative keywords to eliminate credit card numbers" enabled, keywords listed here are used to eliminate credit card numbers when searching. Any keyword that appears before each potential credit card number causes that number to be dropped from search results.
-
For example, if a file contains "Tracking: 123456789," and "123456789" is a valid credit card number, with this setting is enabled and "Tracking" listed as an entry in the list, then the term "123456789' does not appear as a search result.
-
-
Disabled - Do not use negative keywords to eliminate credit card number
-
-
Enable searching for American Express Numbers
-
Enabled - Default. Enable searching for American Express credit card numbers
-
Disabled - Disable searching for American Express credit card numbers
-
-
Enable searching for Australian BankCard Numbers
-
Enabled - Default. Enable searching for Australian BankCard numbers
-
Disabled - Disable searching for Australian BankCard numbers
-
-
Enable searching for Cart Blanche Numbers
-
Enabled - Default. Enable searching for Cart Blanche numbers
-
Disabled - Disable searching for Cart Blanche numbers
-
-
Require a CVV/CID number to be near a card number
-
Enabled - Require a CVV/CID number to be near (within 50 characters) a card number
-
Disabled - Default. Do not require a CVV/CID number to be near (within 50 characters) a card number
-
-
Enable searching for Diners Club Numbers
-
Enabled - Default. Enable searching for Diners Club numbers
-
Disabled - Disable searching for Diners Club numbers
-
-
Enable searching for Discover/Novus Numbers
-
Enabled - Default. Enable searching for Discover/Novus numbers
-
Disabled - Disable searching for Discover/Novus numbers
-
-
Enable searching for Enroute Numbers
-
Enabled - Default. Enable searching for Enroute numbers
-
Disabled - Disable searching for Enroute numbers
-
-
Require an expiration date to be near a card number
-
Enabled - Require a an expiration date to be near (within 50 characters) a potential credit card number in order for the credit card number to be considered valid and shown in search results.
-
Note: When both this setting and the setting "Require a CVV/CID number to be near a card number" are enabled, both a CVV/CID number and an expiration date are required before a potential credit card number is considered a valid match.
-
-
Disabled - Default. Do not require an expiration date to be near (within 50 characters) a card number to be considered valid and shown in search results.
-
-
Enable searching for JCB Numbers
-
Enabled - Default. Enable searching for JCB numbers
-
Disabled - Disable searching for JCB numbers
-
-
Enable searching for Maestro Numbers
-
Enabled - Default. Enable searching for Maestro numbers
-
Disabled - Disable searching for Maestro numbers
-
-
Enable searching for MasterCard Numbers
-
Enabled - Default. Enable searching for MasterCard numbers
-
Disabled - Disable searching for MasterCard numbers
-
-
Enable searching for Track 1 data
-
Enabled - Default. Enable searching for Track 1 data. The textual representation of the data stored on track 1 of a magnetic stripe card may include credit card (CCN)/personal account number (PAN) data including: account numbers, expiration dates, and cardholder name.
-
Disabled - Disable searching for Track 1 data
-
-
Enable searching for Track 2 data
-
Enabled - Default. Enable searching for Track 2 data. The textual representation of the data stored on track 2 of a magnetic stripe card may include credit card (CCN)/personal account number (PAN) data including: account numbers, expiration dates, and cardholder name.
-
Disabled - Disable searching for Track 2 data
-
-
Enable searching for Visa Numbers
-
Enabled - Default. Enable searching for Visa numbers
-
Disabled - Disable searching for Visa numbers
-
-
Enable searching for old 13 digit Visa Numbers
-
Enabled - Default. Enable searching for old 13-digit Visa numbers
-
Disabled - Disable searching for old 13-digit Visa numbers
-
-
Enable searching for Credit Card Numbers with a less stringent delimiter requirement
-
Enabled - Default. Enable searching for Credit Card numbers with a less stringent delimiter requirement
-
Disabled - Disable searching for Credit Card numbers with a less stringent delimiter requirement
-
-
Use negative keywords to eliminate credit card numbers
-
This setting works in conjunction with the setting "Negative keywords for eliminating credit card numbers."
-
Enabled - With this setting enabled any keyword in the field "Negative keywords for eliminating credit card numbers" that appears before each potential credit card number, will cause that credit card number to be dropped from search results.
-
For example, if a file contains "Tracking: 123456789," and "123456789" is a valid credit card number, with this setting is enabled and "Tracking" listed as an entry in the list, then the term "123456789' does not appear as a search result.
-
-
Disabled - Do not use negative keywords to eliminate potential credit card numbers.
-
-
Value
-
Ordinal value of each instance of the sensitive data type - a credit card number, in this case.
-
For monetary value, see Dollar Value, below.
-
-
Dollar Value
-
Value, in US dollars, of every instance of the sensitive data type (credit card number, in this case).
-
Default values are taken from various reports such as the IBM data breach report, Gartner, and Ponemon.
-
Password
-
Match passwords with non-printable characters
-
Enabled - Match passwords with non-printable characters
-
Disabled - Do not match passwords with non-printable characters
-
-
Specify which file types to search comprehensively
-
Specify which file types to search for with an additional, comprehensive test:
-
None
-
Filterable files only
-
All files
-
-
-
Negative keywords for eliminating passwords
-
Enabled - Negative keywords for eliminating passwords
-
-
Use negative keywords to eliminate Passwords
-
Enabled - Use negative keywords to eliminate Passwords
-
- Value
-
Ordinal value of each instance of the sensitive data type - a credit card number, in this case.
-
For monetary value, see Dollar Value, below.
-
-
Dollar Value
-
Value, in US dollars, of every instance of the sensitive data type (credit card number, in this case).
-
Default values are taken from various reports such as the IBM data breach report, Gartner, and Ponemon.
-
Bank Account Number
-
Allow the next character after the match to be a punctuation symbol
-
Enabled - Allows for the next character after a potential bank account number match to be a punctuation character (period, question mark, or semi-colon). When enabled, this will allow numbers such as 12-3456789? to match as a valid bank account number as long as the number could be valid and the punctuation character is followed by whitespace.
-
Disabled - By default, this value is disabled.
-
-
Delimiters to be used when searching
-
Specify additional valid delimiters when searching
-
To add additional character delimiters such as pipe (|) or caret (^) to a search, specify those delimiters here, one delimiter per line.
-
-
Negative keywords for eliminating bank account numbers
-
Enabled - The terms entered in this field (referred to as negative keywords) that if found before a potential bank account number during a scan render the bank number invalid and it is dropped from search results. This setting requires the setting "Use negative keywords to eliminate bank account numbers" to be enabled.
-
For example, if a file contains the text "Tracking: 123456789" and "123456789" is a valid bank number, with this setting enabled, and "Tracking" listed as a negative keyword, then "123456789" would not appear as a search result.
-
-
Disabled - Do not use negative keywords when scanning for Bank Account numbers
-
-
Enable searching for ABA Routing Numbers
-
Enabled - Search for ABA Routing numbers when Bank Account AnyFind is enabled.
-
Disabled - Do not search for ABA Routing numbers when Bank Account AnyFind is enabled.
-
-
Enable searching for bank account numbers with general formats
-
Search for alphanumeric bank account numbers when Bank Account AnyFind is enabled.
-
Note: This setting is equivalent to enabling Bank Account AnyFind prior to version 7.0 of the endpoint software. When this setting is enabled and "Enable searching for ABA Routing Numbers", "Enable searching for International Bank Account Numbers (IBAN)", and "Enable searching for SWIFT/BIC Codes" are disabled, Bank Account AnyFind will function identically to v6 and earlier.
-
-
Enable searching for International Bank Account Numbers (IBAN)
-
Disabled - Default. Disable searching for International Bank Account Numbers (IBAN)
-
Enabled - Enable searching for International Bank Account Numbers (IBAN)
-
-
Enable searching for SWIFT/BIC Codes
- Disabled - Do not search for International SWIFT/BIC Codes
- Enabled - Search for International SWIFT/BIC Codes when Bank Account AnyFind is enabled.
-
The minimum valid length of a bank account number
-
Specify the minimum number of digits in a valid bank account number.
-
Any possible bank account number matches that are less than this length are discarded.
-
-
Require an additional keyword in the location
-
Enabled - Default. When identifying bank accounts, the endpoint application requires financial keywords to be in the search location (file) (for example, file or e-mail) - in addition to those used to initially identify the bank account number - in order to consider a bank account number a valid match.
-
Disabled - Disables the search for additional keywords to be in the search location (file) (for example, file or e-mail) when considering a bank account number as a sensitive data match.
-
-
The location of keywords when searching for SWIFT/BIC Codes
-
Enabled - Search for International SWIFT/BIC Codes when Bank Account AnyFind is enabled
-
Disabled - Do not search for International SWIFT/BIC Codes when Bank Account AnyFind is enabled
-
-
Use negative keywords to eliminate bank account numbers
-
Enabled - Use negative keywords (as listed in the field "Negative keywords for eliminating bank account numbers") to eliminate bank account numbers. See "Negative keywords for eliminating bank account numbers," above.
-
Disabled - Do not use negative keywords to eliminate bank account numbers
-
- Value
-
Ordinal value of each instance of the sensitive data type - a bank account number, in this case.
-
For monetary value, see Dollar Value, below.
-
-
Dollar Value
-
Value, in US dollars, of every instance of the sensitive data type (bank account number, in this case).
-
Default values are taken from various reports such as the IBM data breach report, Gartner, and Ponemon.
-
Drivers License
-
Allow license as a keyword without other driver license keywords
-
By default, the endpoint application requires driver license keywords before matching a pattern as a driver license.
-
Enabled - Allow the use of the license keyword(s) without specific driver license keywords
-
Disabled - Disallow the use of the license keyword(s) without specific driver license keywords
-
-
-
Allow driver license numbers of less than 5 digits
-
By default, in order to reduce false positives, the Agent does not match driver licenses that are 1, 2, 3, or 4 digits with no other characters.
-
Enabled - Match driver license numbers that are 1, 2, 3, or 4 digits with no other characters.
-
Disabled -Default. Do not match driver licenses that are 1, 2, 3, or 4 digits with no other characters.
-
-
Use Custom keywords for validating driver license numbers
-
Enabled - Use a list of additional, negative keywords to be used when the setting "Use Negative keywords for eliminating driver license numbers" is enabled. Keywords must be entered one per line.
-
Disabled - Default. Do not use custom keywords for validating driver license numbers.
-
-
Negative keywords for eliminating driver license numbers
-
Enabled - The terms entered in this field (referred to as negative keywords) that if found before a potential driver license number during a scan render the driver license number invalid and it is dropped from search results. This setting requires the setting "Use negative keywords to eliminate driver licenses" to be enabled.
-
For example, if a file contains the text "Tracking: 123456789" and "123456789" is a valid driver license number, with this setting enabled, and "Tracking" listed as a negative keyword, then "123456789" would not appear as a search result.
-
-
Disabled - Default. Do not use negative keywords to validate driver license numbers.
-
-
Restrict driver licenses by state
-
By default, Spirion Agents match driver license numbers from all US States.
-
Enabled - Restrict valid matches to specific states or all states except specific ones. You must specify valid states in the value "States to include or exclude from the search."
-
Disabled - Default. Do not restrict driver licenses by state. Match driver license numbers from all US States.
-
-
Specify that the list of states is an include list
-
By default, any states selected in the setting "States to include or exclude from the search" are treated as the only valid states to match driver's license numbers. To match all states except those in the list, set this value to disabled.
-
Enabled - The states selected in the setting "States to include or exclude from the search" are considered the only valid states for driver's license matches.
-
Disabled - The states selected in the setting "States to include or exclude from the search" are considered invalid states for driver's license matches.
-
-
Require keyword for Washington State driver licenses
-
By default, a keyword is required to match all driver licenses. Because Washington State licenses has a validation algorithm, false positives are less likely than with other states when not requiring a keyword.
-
Disabled - Default. Remove the keyword requirement for Washington State driver licenses
-
Enabled - Require a keyword to match Washington State driver licenses
-
-
Specify when state is required to match driver licenses
-
In order to match a driver license, the Spirion Agent application, when scanning, requires the state name or abbreviation, if the driver license number is all numeric. This behavior can be changed using the following settings:
-
Never require state - Never require the state name or abbreviation
-
Require for numeric only when < 6 chars - Require the state for all numeric-only licenses less than 6 digits
-
Require for numeric only of any length - Require the state name or abbreviation for all numeric-only driver license numbers of any length (default)
-
Always require state - Always require the state name or abbreviation when searching for driver license numbers
-
-
-
States to include or exclude from the search
-
Specify the list of states, by state abbreviation, to include or exclude from driver license searches.
-
-
Use negative keywords to eliminate driver licenses
-
Any keyword that appears in the field "Negative keywords for eliminating driver license numbers" that appears before each potential driver license number, will cause that number to be dropped from search results.
-
For example, if a file contains the terms "Tracking: 123456789" and the term "123456789" is a valid driver license number, with this setting is enabled, and the term "Tracking" listed as an entry in the list, then the term "123456789" would not appear as a search result.
-
-
Enabled - Use negative keywords to eliminate driver licenses
-
Disabled - Default. Do not use negative keywords to eliminate driver licenses
-
- Value
-
Ordinal value of each instance of the sensitive data type - a bank account number, in this case.
-
For monetary value, see Dollar Value, below.
-
-
Dollar Value
-
Value, in US dollars, of every instance of the sensitive data type (bank account number, in this case).
-
Default values are taken from various reports such as the IBM data breach report, Gartner, and Ponemon.
-
Date of Birth
-
Day of the month for the upper bound of the AnyFind DoB date range
-
The day of the month for the upper bound of the AnyFind date of birth date range
-
-
Month for the upper bound of the AnyFind DoB date range
-
The month for the upper bound of the AnyFind date of birth date range
-
-
Year for the upper bound of the AnyFind DoB date range
-
The year for the upper bound of the AnyFind date of birth date range
-
-
Day of the month for the lower bound of the AnyFind DoB date range
-
The day of the month for the lower bound of the AnyFind date of birth date range
-
-
Month for the lower bound of the AnyFind DoB date range
-
The month for the lower bound of the AnyFind date of birth date range
-
-
Year for the lower bound of the AnyFind DoB date range
-
The year for the lower bound of the AnyFind date of birth date range
-
-
Additional keywords for finding dates of birth
-
List of additional, custom keywords to use when searching for dates of birth.
-
Dates of birth are not considered search matches unless
-
Enter keywords one per line.
-
-
Negative keywords for eliminating dates of birth
-
List of additional, negative keywords to be used when the setting "Use negative keywords to eliminate dates of birth" is enabled.
-
Keywords must be entered one per line.
-
-
Use a date range for AnyFind DoB
-
To enable the use of a date range to restrict AnyFind date of birth
-
-
Use a date range based on today's date for AnyFind DoB
-
When AnyFind date of birth is enabled, all dates of birth will found by default. Using the setting "Use a date range for AnyFind DoB", a static date range can be specified where only dates of birth within that range will be found
-
Using the setting a static date range can be specified where only dates of birth within that range will be found. Alternatively, a variable date range based on the current date can also be used.
-
For example, if it is desirable to only find dates of birth for people that are 18 years or older, you can enable this setting, select "Use variable range, offset is lower bound", and set "Specify the offset when using a variable date range" to 18. The endpoint application will then automatically calculate the proper date range at search time.
-
Do not use variable range (0) - Default. When this setting is enabled, all dates of birth are found by default.
-
Use variable range, offset is upper bound (1) - Use a variable date range based on the current date, for people of age X and lower (see the example above). Set the setting "Specify the offset when using a variable date range" to the upper age limit of the people you are searching for. This limits the search to people of age X and lower.
-
Use variable range, offset is lower bound (2) - Use a variable date range based on the current date, for people of age X and higher (see the example above). Set the setting "Specify the offset when using a variable date range" to the lower age limit of the people you are searching for. This limits the search to people of age X and older.
-
-
Match every date as a DoB, if file contains keyword
-
Specify the search locations (files) in your environment where all dates should be matched when the specified search location (file)s contains a date of birth keyword.
-
None - Default.
-
Excel and CSV files - Specify search location (file)s of Excel and CSV files
-
-
Use custom keywords when finding dates of birth
-
Disable (0) - Default. Disable the use of additional, custom keywords to use when searching for dates of birth
-
Enable (1) - Enable the use of additional, custom keywords to use when finding dates of birth
-
-
Use negative keywords to eliminate dates of birth
-
Disable (0) - Default. Do not use negative keywords to eliminate dates of birth when searching.
-
Enable (1) - Enable the use of negative keywords. This setting works in conjunction with the setting "Negative keywords for eliminating dates of birth." With this setting enabled, any keyword that appears in the value "Negative keywords for eliminating dates of birth" before each potential date of birth, causes that date of birth to be dropped from search results. For example, if a file contains the terms "Tracking: 01/02/2003" and "01/02/2003" is a valid date of birth, with the term "Tracking" listed as an entry in the list, then "01/02/2003" does not appear as a search result.
-
-
Specify the offset when using a variable date range
-
When the setting "Use a date range based on today's date for AnyFind DoB" is enabled, a variable date range based on the current date will be used.
-
For example, if it is desirable to only find dates of birth for people that are 18 years or older, enable "Use a date range based on today's date for AnyFind DoB," and enter a value of 18 in this setting. The endpoint application automatically calculates the proper date range at search time.
-
Valid values: 0-100
-
- Value
-
Ordinal value of each instance of the sensitive data type - a date of birth, in this case.
-
For monetary value, see Dollar Value, below.
-
-
Dollar Value
-
Value, in US dollars, of every instance of the sensitive data type (date of birth, in this case).
-
Default values are taken from various reports such as the IBM data breach report, Gartner, and Ponemon.
-
Telephone Number
-
Specify additional valid delimiters when searching
-
To add additional character delimiters such as pipe (|) or caret (^) to a search, specify them one delimiter per line.
-
-
Negative keywords for eliminating phone numbers
-
List of additional, negative keywords to be used when the setting "Use negative keywords to eliminate phone numbers" is enabled.
-
Keywords must be entered one per line.
-
-
Restrict phone numbers by area code and exchange
-
By default, the endpoint application matches phone numbers in all area codes and exchanges. You must specify states in the value "Area codes and exchanges to include or exclude from the search."
-
Disable (0) - Default. The Agent application matches phone numbers in all area codes and exchanges.
-
Enable (1) - Restrict valid matches to specific areas code/exchanges or all area codes/exchanges except those specified.
-
-
Specify that the list of phone ranges is an include list
-
Exclude List - This option matches all phone number ranges except those listed in the field "Area codes and exchanges to include or exclude from the search."
-
Include List - Default. This option treats any phone number ranges listed in the field "Area codes and exchanges to include or exclude from the search" as the only valid phone numbers to match against.
-
-
Area codes and exchanges to include or exclude from the search
-
Specify the list of area code and exchange ranges to include or exclude from the phone number search.
-
-
Use negative keywords to eliminate phone numbers
-
Any keyword in the field "Negative keywords for eliminating phone numbers" that appears before each potential phone number, will cause that phone number to be dropped from search results.
-
For example, with this setting enabled, if a file contains the terms "Tracking: (123) 456-7890" and "(123) 456-7890" is a valid phone number, and "Tracking" is listed as an entry in the list, then "(123) 456-7890" would not appear as a search result.
-
-
Disable (0) - Default. Disables the use of negative keywords.
-
Enable(1) - Enables the use of negative keywords.
-
- Value
-
Ordinal value of each instance of the sensitive data type - telephone number, in this case.
-
For monetary value, see Dollar Value, below.
-
-
Dollar Value
-
Value, in US dollars, of every instance of the sensitive data type (telephone number, in this case).
-
Default values are taken from various reports such as the IBM data breach report, Gartner, and Ponemon.
-
E-Mail Address
-
Include valid domains with non-Latin characters when searching for E-Mail Addresses
-
Disabled - Default. By default, when searching for E-Mail Addresses, only domains that include non-accented Latin characters are matched.
-
Enabled - Include both accented and non-Latin characters in the domain portion of an E-Mail Address
-
-
Include usernames to include non-Latin characters when searching for E-Mail Addresses
-
Disabled - Default. By default, when searching for e-mail addresses, only usernames that include non-accented Latin characters are eligible to be matched
-
Enabled - Include accented and non-Latin characters in the username portion of an E-Mail Address, set this to "Allow" (1)
-
-
Specify additional valid delimiters when searching
-
To add additional character delimiters such as pipe (|) or caret (^) to a search, specify the delimiters, one per line.
-
-
Negative keywords for eliminating email addresses
-
List of additional, negative keywords to use to eliminate email addresses from matches.
-
Requires the setting "Use negative keywords to eliminate email addresses" is enabled.
-
Keywords must be entered one per line.
-
-
Specify the e-mail address domain restriction option
-
To change the e-mail address domains to be included or excluded from search for the default, common list (biz;com;edu;gov;mil;net;org), set this setting to Custom domain list or All domains.
-
Only common domains (0: Default): Only .biz,.com, .edu, .gov, .mil, .net, and. org addresses will be included in the results. The settings "Specify that the list of domains is an include list" and "Domains to include or exclude from the search" are ignored.
-
Custom domain list (1): A user specified list of domains will determine which addresses are included in the results. The list of valid domains must be specified in the setting "Domains to include or exclude from the search".
-
All domains (2): All valid e-mail addresses with a valid domain are included in the results. The settings "Specify that the list of domains is an include list" and "Domains to include or exclude from the search" are ignored.
-
-
Domains to include or exclude from the search
-
Specify the list of domains to include or exclude from the e-mail address search.
-
This setting is read only when the setting "Specify the e-mail address domain restriction option" is set to Custom domain list.
-
-
Specify that the list of domains is an include list
-
By default, any domains listed in the setting "Domains to include or exclude from the search" are treated as the only valid domains with which to match.
-
Disabled - Match all domains except those domains listed in the setting "Domains to include or exclude from the search". This setting is read only when the setting "Specify the e-mail address domain restriction option" is set to Custom domain list.
-
Enabled - All domains listed in the setting "Domains to include or exclude from the search" are considered valid domains with which to match.
-
-
Use negative keywords to eliminate email addresses
-
Disabled - Default. Do not use negative keywords to eliminate email addresses.
-
Enabled - Enable the use of negative keywords to eliminate potential email addresses when searching. Any keyword in the field "Negative keywords for eliminating email addresses" that appears before each potential email address, causes that email address to be dropped from search results. For example, if a file contains the terms "Tracking: test@server.com," and "test@server.com" is a valid email address, with this setting enabled, if the term "Tracking" is an entry in the field "Negative keywords for eliminating email addresses", then "test@server.com" will not appear as a search result.
-
Personal Address
-
Negative keywords for eliminating personal addresses
-
List of additional, negative keywords to be used when the setting "Use negative keywords to eliminate personal addresses" is enabled.
-
Keywords must be entered one per line.
-
-
Restrict personal addresses by state
-
Disabled - Default. The Spirion Agent application matches personal addresses from all US States.
-
Enabled - Restrict valid sensitive data matches to specific states or all states except specific ones. You must specify which states to match in the setting "States to include or exclude from the search."
-
-
Restrict personal addresses by zip code
-
Disabled - Default. The Spirion Agent application will match personal addresses from all zip codes
-
Enabled - Restrict the valid matches to either specific zip codes or all zip codes except those specified. You must specify zip codes in the setting "Zip codes to include or exclude from the search".
-
-
Specify that the list of states is an include list
-
Disabled - Match all states except those listed in the field "States to include or exclude from the search" (treat states in the list as states to exclude from matches).
-
Enabled - By default, any states listed in the setting "States to include or exclude from the search" are treated as the only valid states to match.
-
-
Specify that the list of zip codes is an include list
-
Disabled - Match all zip codes except those listed in the field "Zip codes to include or exclude from the search" (treat zip codes in the list as zip codes to exclude from matches).
-
Enabled - By default, any zip codes listed in the setting "Zip codes to include or exclude from the search" are treated as the only valid zip codes to match.
-
-
States to include or exclude from the search
-
States to include or exclude from the personal address search as defined by the setting "Specify that the list of states is an include list."
-
Use state abbreviations such as: "AK", "AL", "AR", "AZ", etc.
-
-
Use negative keywords to eliminate personal addresses
-
Disabled - Default. Do not use negative keywords to eliminate personal addresses
-
Enabled - Enable the use of negative keywords to eliminate potential personal addresses when searching. Any keyword in the field "Negative keywords for eliminating personal addresses" that appears before each potential personal addresses, causes that personal address to be dropped from search results. For example, if a file contains the terms "Tracking: "123 test street, test city, 12345," and "123 test street, test city, 12345" is a valid address," with this setting enabled, if the term "Tracking" is an entry in the field "Negative keywords for eliminating personal addresses", then "123 test street, test city, 12345" will not appear as a search result.
-
-
Zip codes to include or exclude from the search
-
Zip codes to include or exclude from the personal address search as defined by the setting "Specify that the list of zip codes is an include list."
-
Enter one zip code per line
-
- Value
-
Ordinal value of each instance of the sensitive data type - personal addresses, in this case.
-
For monetary value, see Dollar Value, below.
-
-
Dollar Value
-
Value, in US dollars, of every instance of the sensitive data type (personal addresses, in this case).
-
Default values are taken from various reports such as the IBM data breach report, Gartner, and Ponemon.
-
Passport Number
-
Allow the next character after the match to be a punctuation symbol
-
Disabled - Default. Do not allow the character after a potential passport number match to be a punctuation character.
-
Enabled - Allow the character after a potential passport number match to be a punctuation character (period, question mark, or semi-colon). When enabled, the term "123456789?" is considered a match as a valid passport number as long as the number could be valid and the punctuation character is followed by whitespace.
-
-
Specify additional valid delimiters when searching
-
To add additional character delimiters such as pipe (|) or caret (^) to a search, specify them one delimiter per line.
-
-
Additional keywords for validating passport number
-
Use a larger set of keywords to validate passport numbers
-
Enable - By default, the word "passport" is required to validate a passport number. Enable this setting to expand the validation to include other keywords such as "nationality."
-
Disable - Default. Require only the word "passport" to validate a passport number.
-
-
Negative keywords for eliminating passport numbers
-
Disable - Do not use negative keywords to eliminate passport numbers when searching passport number locations (files).
-
Enable - Enable the use of negative keywords. Any keyword that appears in the field "Negative keywords for eliminating passport numbers" that appears before each potential passport number, causes that number to be dropped from search results. For example, if a file contains the terms "Tracking: 123456789" and "123456789" was a potentially valid passport number (because of other proximate keywords and validation), with this setting enabled, if the term "Tracking" is an entry in the list, then the term "123456789" would not appear as a search result.
-
-
Match every potential passport number, if file contains keyword
-
Disable - Default. Do not match potential passport numbers based on a specified keyword.
-
Enable - Specify search location (file)s where all potential passport numbers should be matched when the search location (file) contains a passport keyword.
-
-
Use a larger set of keywords to validate passport numbers
-
Enable - By default, the word "passport" is required to validate a passport number. Enable this setting to expand the validation to include other keywords such as "nationality."
-
Disable - Default. Require only the word "passport" to validate a passport number.
-
-
Use custom keywords when validating passport numbers
-
Enable - Enable the use of additional, custom keywords when validating passport numbers.
-
Disable - Default. Disable the use of additional, custom keywords when validating passport numbers.
-
-
Use negative keywords to eliminate passport numbers
-
Disable (0) - Default. Disables the use of negative keywords.
-
Enable(1) - Enables the use of negative keywords. Any keyword in the field "Negative keywords for eliminating passport numbers" that appears before each potential phone number causes that passport number to be dropped from search results. For example, with this setting enabled, if a file contains the terms "Tracking: 123456789" and "123456789" is a valid passport number, if the term "Tracking" is an entry in the list, then the term "123456789" would not appear as a search result.
-
- Value
-
Ordinal value of each instance of the sensitive data type - passport number, in this case.
-
For monetary value, see Dollar Value, below.
-
-
Dollar Value
-
Value, in US dollars, of every instance of the sensitive data type (passport number, in this case).
-
Default values are taken from various reports such as the IBM data breach report, Gartner, and Ponemon.
-
Canada: SIN
-
Negative keywords for eliminating Social Insurance Numbers (Canada)
-
List of additional, negative keywords to be used when the setting "Use negative keywords to eliminate Social Insurance Numbers (Canada)" is enabled.
-
Keywords must be entered one per line.
-
-
Use negative keywords to eliminate Social Insurance Numbers (Canada)
-
Disable - Disable the use of negative keywords.
-
Enable - Enable the use of negative keywords. Any keyword that appears in the field "Custom Negative Keywords" that appears before each potential Canadian Social Insurance Numbers, will cause that SIN to be dropped from search results.
-
For example, if a file contains the term "Tracking: 123 456 789" and "123 456 789" is a valid SIN, with this setting is enabled, if the term "Tracking" is an entry in the list, then the term "123 456 789" would not appear as a search result.
-
-
- Value
-
Ordinal value of each instance of the sensitive data type - SIN number, in this case.
-
For monetary value, see Dollar Value, below.
-
-
Dollar Value
-
Value, in US dollars, of every instance of the sensitive data type - SIN number, in this case.
-
Default values are taken from various reports such as the IBM data breach report, Gartner, and Ponemon.
-
United Kingdom: NINO
-
Negative keywords for eliminating National Insurance Numbers (United Kingdom)
-
List of additional, negative keywords to be used when Use Negative Keywords is enabled.
-
Keywords must be entered one per line.
-
-
Use negative keywords to eliminate National Insurance Numbers (United Kingdom)
-
Any keyword that appears in the value Custom Negative Keywords that appears before each potential UK National Insurance Number, will cause that NINO number to be dropped from search results.
-
For example, if a file contains the terms "Tracking: JG 48 86 10" and "JG 48 86 10" is a valid NINO, with this setting is enabled, if the term "Tracking" is an entry in the list, then the term "JG 48 86 10" would not appear as a search result.
-
-
Enabled - Enable the use of negative keywords
-
Disabled - Disable the use of negative keywords
-
- Value
-
Ordinal value of each instance of the sensitive data type - NINO number, in this case.
-
For monetary value, see Dollar Value, below.
-
-
Dollar Value
-
Value, in US dollars, of every instance of the sensitive data type - NINO number, in this case.
-
Default values are taken from various reports such as the IBM data breach report, Gartner, and Ponemon.
-
United Kingdom: NHS
-
Negative keywords for eliminating National Insurance Numbers (United Kingdom)
-
List of additional, negative keywords to use when the setting "Use Negative Keywords" is enabled.
-
Keywords must be entered one per line.
-
-
Use negative keywords to eliminate National Insurance Numbers (United Kingdom)
-
Disabled (0) - Disable the use of negative keywords
-
Enabled (1) - Enable the use of negative keywords. Any keyword that appears in the field "Custom Negative Keywords" that appears before each potential UK National Insurance Number, causes that NINO number to be dropped from search results.
-
For example, if a file contains the terms "Tracking: JG 48 86 10" and "JG 48 86 10" is a valid NINO, with this setting enabled, if the term "Tracking" is an entry in the list, then the term "JG 48 86 10" would not appear as a search result.
-
-
- Value
-
Ordinal value of each instance of the sensitive data type - NHS number, in this case.
-
For monetary value, see Dollar Value, below.
-
-
Dollar Value
-
Value, in US dollars, of every instance of the sensitive data type - NHS number, in this case.
-
Default values are taken from various reports such as the IBM data breach report, Gartner, and Ponemon.
-
Australia: TFN
-
Negative keywords for eliminating Tax File Numbers (Australia)
-
List of additional, negative keywords to be used when the setting "Use negative keywords to eliminate Tax File Numbers (Australia)" is enabled.
-
Keywords must be entered one per line.
-
-
Use negative keywords to eliminate Tax File Numbers (Australia)
-
Disabled (0) - Disable the use of negative keywords.
-
Enabled (1) - Enable the use of negative keywords. Any keyword in the field "Negative keywords for eliminating Tax File Numbers (Australia)" that appears before each potential Australian Tax File Number, causes that TFN to be dropped from search results.
-
For example, if a file contains the terms "Tracking: 123 456 782" and the term "123 456 782" is a valid TFN, with this setting enabled, and the term "Tracking" listed as an entry in the list, then the term "123 456 782" would not appear as a search result.
-
-
- Value
-
Ordinal value of each instance of the sensitive data type - TFN number, in this case.
-
For monetary value, see Dollar Value, below.
-
-
Dollar Value
-
Value, in US dollars, of every instance of the sensitive data type - TFN number, in this case.
-
Default values are taken from various reports such as the IBM data breach report, Gartner, and Ponemon.
-
Health Information
-
Require DEA numbers when using Health Information AnyFind
-
A Health Information result is either a Social Security number or medical record number (specified as a regular expression).
-
To consider a Social Security number or a medical record number as a result, additional validation can be optionally required.
-
Disabled - Do not require a DEA (Drug Enforcement Agency) number to be matched in the search locations (files) before returning the Health Information match in the search results for the location (file).
-
Enabled - A DEA (Drug Enforcement Agency) number must be matched in the search location (file) before returning the Health Information match in the search results for the location (file).
-
-
Require Dictionary matches when using Health Information AnyFind
-
A Health Information result is either a SSN or an MRN (specified as a regular expression). In order to consider that SSN or MRN as a result, additional validation can be optionally required.
-
Disabled - Do not require an entry in a dictionary to be matched when using the Health Information AnyFind.
-
Enabled - Require an entry in a dictionary to be matched when using the Health Information AnyFind. With this setting enabled then an entry in the specified dictionary must be matched in the search location (file) before returning the Health Information match in the search results for that location (file). The dictionary to be used for validation must be specified in the setting "The dictionary to use to validate Health Information results."
-
-
Require Medical Record Numbers when using Health Information AnyFind
-
When the setting "Require Social Security Numbers when using Health Information AnyFind" is enabled, a medical record number (MRN) can also be required.
-
Disabled - Do NOT require an MRN to be matched when using the Health Information AnyFind.
-
Enabled - Require a medical record number to be matched when using the Health Information AnyFind. An MRN must be matched in the search location (file) before returning the Health Information match in the search results for the search location (file). The regular expression to use is specified in the setting "The regular expression to be used when searching for Health Information."
-
-
Require National Provider Identification numbers when using Health Information AnyFind
-
A Health Information result is either a Social Security number or medical record number (MRN) - specified as a regular expression. In order to consider that SSN or MRN as a result, additional validation can be optionally required.
-
Disabled - Do NOT require an NPI number to be matched when using the Health Information AnyFind.
-
Enabled - Require an NPI (National Provider Identifier) number to be matched when using the Health Information AnyFind. If this setting is enabled, then an NPI must be matched in the search location (file) before returning the Health Information match in the results for the search location (file).
-
-
Require Social Security numbers when using Health Information AnyFind
-
Disabled - Do not require Social Security numbers when using Health Information AnyFind
-
Enabled - Require Social Security numbers when using Health Information AnyFind
-
-
The regular expression to be used when searching for Health Information
-
A Health Information result is either a Social Security number (SSN) or an Medical Record number (MRN) - specified as a regular expression.
-
A valid regular expression must be specified in this setting when using a Medical Record number (MRN) as the Health Information or as a validator when using a Social Security number (SSN) as the Health Information.
-
-
The dictionary to use to validate Health Information results
-
This setting works in conjunction with "Require Dictionary matches when using Health Information AnyFind."
-
When using the setting "Require Dictionary matches when using Health Information AnyFind," use this setting to specify the full path to the dictionary or the dictionary name if that dictionary has already been specified in the dictionary list via the UI or console policy.
-
Edit a Custom Data Type
To edit a custom Data Type:
-
Ensure you are on the Custom Data Types tab.
-
Locate the Custom Data Type you want to edit.
-
On the far right of the row, click the more options menu.
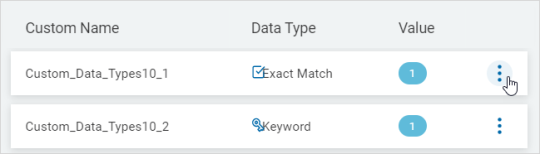
-
Click Edit.

-
In the Edit Custom Data Type pop-up window, make needed changes.
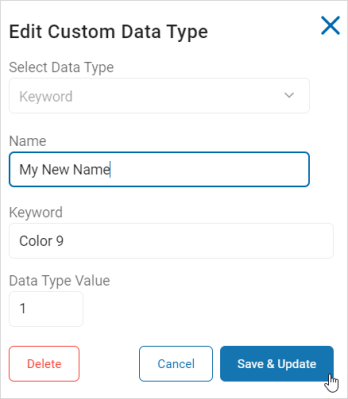
-
Click Save & Update to save the changes, Cancel to discard.
Delete a Custom Data Type
To delete a Custom Data Type:
-
Ensure you are on the Custom Data Types tab.
-
Locate the Custom Data Type you want to delete.
-
On the far right of the row, click the more options menu.
-
Click Edit.
-
In the Edit Custom Data Type pop-up window, click Delete.
-
In the "Delete Data Type" pop-up window, click Confirm to permanently delete the data type or Cancel to discard.
Export a Custom Data Type
To export a custom data type use the following instructions:
-
Ensure you are on the Custom Data Types tab.
-
Locate the custom data type you want to export.
-
On the far right of the row, click the more options menu.
-
Click Export.
-
The data file is exported to your local computer as an XML file.
Sensitive Data Definitions
A Sensitive Data Definition generally consists of three fields. Though in some cases, based on the operator selected, a fourth field displays. These fields are described in the table below:
| Field | Description |
|---|---|
| Sensitive Data Type |
The Sensitive Data Type specifies the type of data that you are filtering for.
|
| Operator |
The Operator defines how results are found based upon the data type.
|
| Value field |
The Value Field specifies the value used to qualify the data.
|
Operator Types
Filters are used by sensitive data definitions to capture instances of sensitive data types (such as Social Security and Credit Card numbers) based on rules/conditions set by you, the user.
-
For example, you may wish to capture social security numbers, but only those which come after a user's email address. You may wish to capture only those social security numbers which appear within 50 characters or less of a user's personal address (including spaces).
Example of distance between data types
Note: You may select more than 1 data type when creating your custom sensitive data definition.
Example of sensitive data definition using multiple data types

To create a filter for a sensitive data definition, you first select a sensitive data type and then you select an operator. There are 22 types of operators available, defined below:
| Operator | Description | Value |
|---|---|---|
| Near |
Tests whether the specified data types are within 50 characters of each other. This distance includes blank spaces.
Near Example
|
|
| Near with Distance |
Tests whether the data types are within a specified distance of each other. This distance includes blank spaces.
Near with Distance Example
|
Enter the distance (in characters). This is the maximum number of characters allowed between data types |
| Near Before |
Tests whether the specified data types are within 50 characters of each other with the requirement the first sensitive data type (A) appears before the second specified data type (B). This distance includes blank spaces.
Near Before Example
|
|
| Near Before with Distance |
Tests whether the specified data types are within a specified distance of each other with the requirement the first sensitive data type (A) set appears before the second specified data type (B) set. This distance includes blank spaces.
Near Before with Distance Example
|
Enter the distance (in characters). This is the maximum number of characters allowed between data types |
| Near After |
Tests whether the specified data types are within 50 characters, or less of each other with the requirement the first specified sensitive data type (A) appears after the second specified data type (B). This distance includes blank spaces.
Near After Example
|
|
| Near After with Distance |
Tests whether the first data type (A) appears after the second specified data type (B) by the distance (number of characters) specified by you, the user. This distance includes blank spaces.
Near After with Distance Example
|
Enter the distance (in characters). This is the maximum number of characters allowed between data types |
| Far |
Tests whether the specified data types are at least 50 characters (or more) away from each other. This distance includes blank spaces.
Far Example
|
|
| Far with Distance |
Tests whether the specified data types appear in locations (files/emails) by the specified number of characters away from each other. This distance includes blank spaces.
Far with Distance Example
|
Enter the distance (in characters). This is the minimum number of characters allowed between data types |
| Far Before |
Tests whether the first specified data type (A) appears in files/emails before the second specified data type (B) by at least 50 characters. This distance includes blank spaces.
By using the Far operator and configuring the distance in a policy, it allows you to use the same distance value for all filters using the Far operator without the need to specify the distance each time you use it in a sensitive data definition. Far Before Example
|
|
| Far Before with Distance |
Tests whether the first specified data type (A) appears in locations (files/emails) before the second specified data type (B) by at least the specified number of characters. This distance includes blank spaces.
Far Before with Distance Example
|
Enter the distance (in characters). This is the minimum number of characters allowed between data types |
| Far After |
Tests whether the first specified data type (A) appears in locations (files/emails) after the second specified data type (B) by 50 characters or more. This distance includes blank spaces.
Far After Example
|
|
| Far After with Distance |
Tests whether the first specified data type (A) appears in locations (files/emails) after the second specified data type (B) by the number of characters specified by you, the user. This distance includes blank spaces.
Far After with Distance Example
|
Enter the distance (in characters). This is the minimum number of characters allowed between data types |
| Before | Tests whether the first specified data type (A) appears before the second specified data type (B). No distance between data types is used in this rule. | Enter the distance (in characters) |


Note: Each of the operators that specify a match count (Equals, Does Not Equal, Less Than, Less Than or Equals, Greater Than, Greater Than or Equals) are for unique match counts. When creating a sensitive data definition and selecting a Keyword as the Sensitive Data Type, the Value must be 0 or 1 as locations can only contain a single, unique instance of a specific Keyword. The result for a keyword is always only the keyword, meaning that you can only ever have one unique match for a keyword as opposed to a Regular Expression or Dictionary which can have many unique matches.
-
For example, if you create a sensitive data definition saying "Keyword > 3", it is never True as you cannot have 3 unique instances of the same keyword in one location.
-
If you create a sensitive data definition saying "Keyword <= 1", then it is possible for this definition to be True.
-
A Regular Expression on the other hand can have multiple unique match counts per definition as a Regular Expression does not specify a specific identity.
-
The following is a list of operators and their valid numerical values when the Data Type = Keyword:
| Field | Description |
|---|---|
| Equals 0 | Returns True only if there are no keyword matches found. |
| Equals 1 | Returns True if there is one unique instance of a specific keyword. |
| Does Not Equal 0 | Returns True if there is one unique instance of a specific keyword. |
| Does Not Equal 1 | Returns True only if there are no keyword matches found. |
| Less Than 1 | Returns True only if there are no keyword matches found. |
| Less Than or Equals 1 | Returns True if there are no matches or there is one unique instance of a specific keyword. |
| Greater Than 0 | Returns True if there is one unique instance of a specific keyword. |
| Greater Than or Equals 0 | Returns True if there are no matches or there is one unique instance of a specific keyword. |
Note: For database searches, the "Near," "Far," "Near with Distance" and "Far with Distance" operators are relevant only to data within a cell, not across cells.
For files, it is per file.
For email, it is the content of the email.